I know, I know, it's almost been a month since my last post. I've been a busy scrapper and a busy momma. My DH turned 32 last weekend and I had to clean the house before everyone came over. I know you all understand EXACTLY what that means.
I also started a photoshop class on Tuesday nights. Let me explain, see my sweetheart got me PSE8 for Christmas 2009. Yes, 2009. Our PC was incredibly outdated and old but I was going to see if I could load the program anyway. At this point it was February 2010. After 5 hours of frustration and loading and reloading software I pick up the box and inspect it thoroughly for approximately the 100th time and realize...the side of the box says MAC OS. I thought this was a photoshop thing originally but for whatever reason, at 12:30 AM on a Sunday night the realization hits that I am holding software for a MAC!!! Yes girls, the blonde is real...just not natural. I also realize that my PC will not run this software due to the lack of a decent graphics card. By the end of March I had my new iMac and PSE8 was loaded and ready to go;) I was so excited. I will not regale the hours of clicking and searching, nor the tears and colorful words that followed, but suffice to say that I was ready to give Adobe a piece of my mind. It was now Winter again and I couldn't even figure out how to pull a photo in. Once I got that down I could not figure out how to keep my tool bars. You may be thinking that I am an idiot. Wait, I'm not done. My sister sat here with me over Christmas one afternoon and taught me some basics. (she is a graphic design artist) Even she was getting frustrated but by the end but I felt a little more comfortable. After New Year's I sat down alone once again to give it a try and was back to tears. I had no tabs on the upper right! Forget the tutorials online, half my stuff was missing and could not be found in the menus so the tutorials were useless. I couldn't figure out what they were talking about. I called Adobe who told me it would cost me $40 for help with this. I sighed in frustration and told the man, "answer me this. Should I consistently have tabs on the right side of my screen?" His answer was "yes, you should always have the 'create' and 'share' tabs on the right side of your screen. I then made the executive decision to completely uninstall the software and reinstall it. In Ozzy's own words "No more tears" :)
I thought about purchasing a notebook for the class but instead decided to make my own. This is the cover. It's done in K and Co Que Sera pattern. I used the Tattered Angels glimmer mists and mask for the gate. I used perfect pearls with a pattern stamp by Prima on the letters down the left.
This is the back. It's just a tad larger than 12 inches so I painted, glimmer misted and added the border.
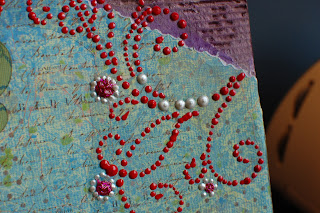
Here's a close up of the letters with the stamp.
Here you can see the different colors of glimmer mis used on the top of the cardboard.
I cut the marque out on my Cricuit and Modge Pode'd it together.
I made the pocket on the inside using masking tape. I put the pocket on before the front. I have pages from magazines that have various tutorials there behind the notebook paper. I need to tab the different sections so they are easy to find.
I LOVE this technique. There is a tutorial on Swirlydoos.com. This is just a regular transparency and some pearlized puff pain. Since I mimicked a Prima "say it with crystals" swirl I used magenta pink glitter glue in place of the crystals.
It may not look like much but this notebook took me a couple of weeks to finish and I still need to tab it!
I went to an all day crop on Saturday. This page has been in progress since the beginning of February. At the crop on Saturday I decided enough was enough and this page was finito!
The title is "Liam sometimes you are 2 cool 4 words" This is my youngest son Liam in front of our house last Summer. Yes, he's a bit of a ham.
This is a stamp that I colored with Copic markers and trailed with iridescent seed beads. I was really happy with the way this turned out. The stamping on the photo is done with a transparency and Stazon ink.
Ok, can I just say that I adore bottle caps?! My GF at the crop asked me if it was a kit from Michael's. I flipped it over to show her the Killian's label!! I had my DH save a bunch for me a long time ago and they have been sitting in my scrap room. I loved the little red wagon but with just a touch of liquid glass you have an ADORABLE accent for your page. Don't forget to hammer the edges down and flatten it just a tad.
This number was inspired by letter stickers my GF Sandy had brought. I know it's difficult to see the glitter but the 4 is actually raised with pop dots and the black is all sparkly. She had a sticker set that was actually giltter on the top and solid shadow but it provided the inspiration that I needed for the number here. See the safety pin holding the tab? Yeah, we're not gonna go there.
I thought Stazon would be a lot more Opaque on transparency than it is. My bad. I traced the letters with zig but it really didn't cut it. I do like the transparent look but it's a tad difficult to see. I think it's cool how the hand stitching at the top still shows through and all the rocket ships on the paper.
And now for the grand finale!!!
At my sister's request, this is my very first scrapbook page ever! Yes, there are fish on a duck hunting page. Vintage right? I got started with stamping up and bought white cardstock, color cardstock, one versatile stamp set, and my album. I had to make my own pattern paper. Although my stamp set was versatile, it wasn't THAT great:) As every scrapper I know I could really do so much better now but there is just something about it like I would be changing history if I took it apart now. Obviously I know much better now what to do with die cuts. Would love for others to share your first page. Don't know if you can load pics in remarks but if now, put it on your page and leave a remark about your first page ever. Here's to 8 years of scrappin'. Slante'


